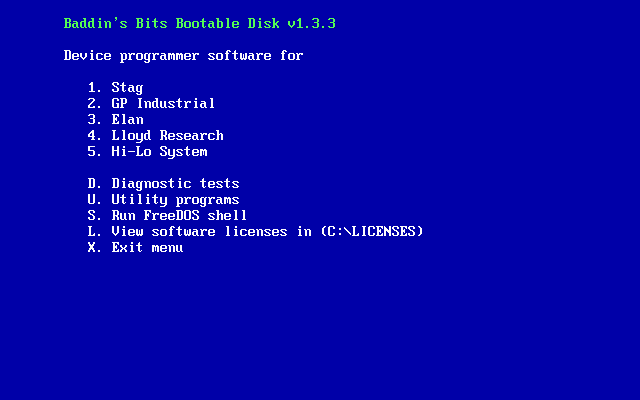
Baddin's Bits Bootable disk
A universal device programmer bootable disk (Live CD)
I know that few people will have the need or the space to have a standalone
device programmer always connected to a PC serial or parallel port. In my case,
I could not remember which PC had the software installed and how it was configured
so it seemed like a good idea to create a bootable CD or USB disk. This would
allow the programmer to be treated more like an appliance than a computer peripheral.
When it came to choosing the operating system to use I did consider using ReactOS,
which is compatible with WIN32 executables, but it did not support the serial
communication API and would not allow parallel communication as Windows itself
does not. Using Linux was possible for serial connections only but finding a
distribution small enough was the problem. So I went with FreeDOS which does
not have the licensing problems associated with MS-DOS.
Parallel port standards
The initial bootable CD worked well with most older PCs but I discovered a
problem when using the parallel version of the Stag protocol with some motherboards.
The parallel ports on their Super I/O ICs did not seem compatible with the original
IBM standard as many of these implemented a PS2 type port when SPP mode was
selected. PS2 type ports are bi-directional instead of uni-directional and normally
have outputs which are disabled for input and cannot be used with the Stag parallel
protocol. When originally testing the parallel Stag protocol I could not get
any ports fitted to a motherboard to work in PS2 mode if there was also a SPP
mode available. StagView would detect the PS2 type port and report that the
mode was incorrectly set in the BIOS. However, many Super I/O chips provide
a PS2 mode with no separate SPP mode and change their output circuitry if set
to uni-directional so Stagview now uses them but it performs a simple test to
prevent hangs if the parallel port cannot be used.
Problems using modern PC hardware
When I created StagView my intention was to allow the use of old Stag PP series
device programmers with current PC hardware. Part of that work was the calibration
of the delays required to work with old slow devices but, as the specification
of a modern PC has changed greatly even from that of only 5 years ago, other
problems have arisen when trying to run DOS communication programs on new hardware.
The need for HDMI connectors and more USB ports on an ATX I/O plate has meant
that serial and parallel port connectors have disappeared from the rear of PCs.
The parallel port seems to have been removed from motherboards completely although
serial port headers can sometimes still be found. The obvious answer is to use
an expansion card to provide the serial and/or parallel interfaces.
When the ISA bus was widely in use, adding a card involved finding a range
of I/O addresses and IRQs that were unused and setting DIP switches on the card.
As a result the address of a serial or parallel port would be fixed so that
a DOS communications program would always be able to use it. Following the introduction
of ISA plug-n-play and later the PCI and PCIe standards, the choice of addresses
and IRQs was made either by the PC BIOS or a plug-n-play OS, which MS-DOS and
FreeDOS are not. Since almost all DOS programs predate the PCI/PCIe bus standards
they would be unaware of any serial or parallel ports on PCI/PCIe cards and
unable to use them. Also, even if they could be configured to use them, as other
cards are added or removed the addresses allocated by the PC BIOS for a specific
card may change.
PRTADD
So that serial and parallel ports on PCI/PCIe cards can be used by a DOS program
the I/O address and IRQ must be known. Some manufacturers of interface ICs do
provide DOS programs to configure them for use with DOS but none of them could
be used in a bootdisk without a lot of work since the values needed are output
to the screen and not easily available to other programs. Some store the I/O
address for a port in the BIOS data area but some don't and the IRQ can not
be stored as historically it was determined from the I/O address used for a
port from the table below. Some allow the I/O address for a port to be remapped
to one of the legacy I/O addresses in the table but because the IRQ cannot be
changed to match the IRQ expected for that address it could only be accessed
using the DOS device names COM1,LPT1 etc. which do not use interrupts. Also
since every manufacturer supplied program only works with their own ICs this
makes a universal solution very difficult.
| Serial |
|
|
Parallel |
|
| I/O address |
IRQ |
|
I/O address |
IRQ |
| 03F8 |
4 |
|
0378 |
7 |
| 02F8 |
3 |
|
0278 |
5 |
| 03E8 |
4 |
|
03BC |
7 |
| 02E8 |
3 |
|
|
|
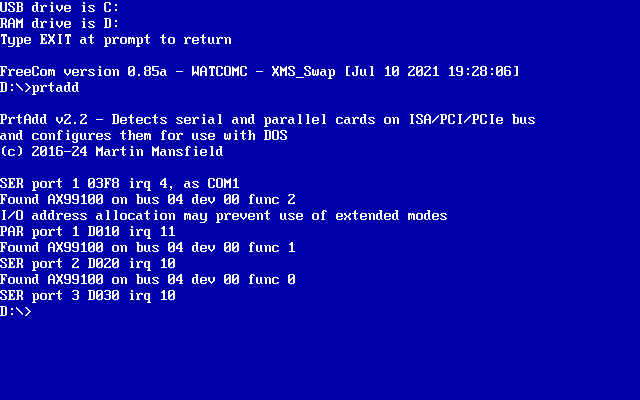
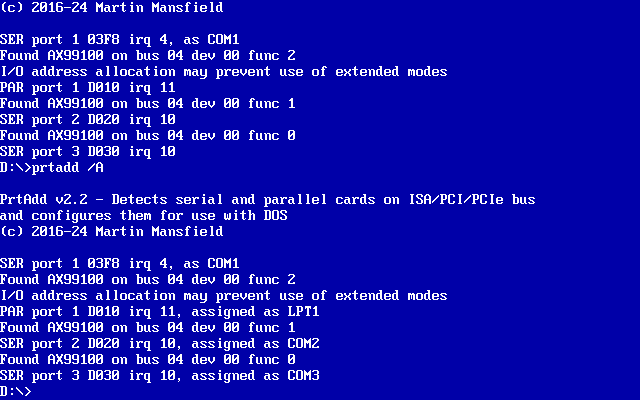
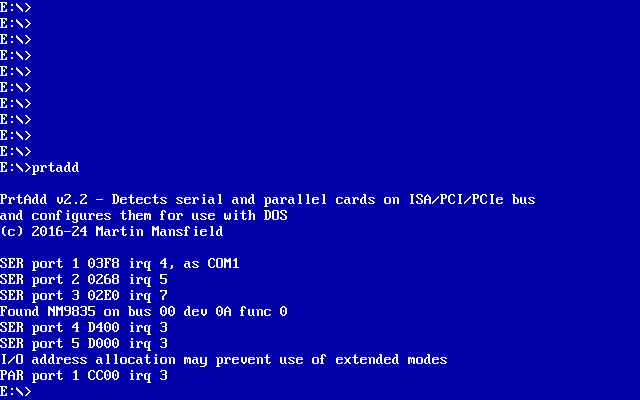
I created the PRTADD program to solve all these problems and allow the DOS
version of StagView to use any serial or parallel PCI/PCIe card that is in its
card database. The database contains many of the latest PCI/PCIe cards and here
is the latest card support list for PRTADD
v2.2.
The program scans the ISA bus for serial and parallel cards at possible locations
and PCI/PCIe buses for the cards in its database and allocates them to COM or
LPT devices. It can also be configured to detect only legacy addresses for any
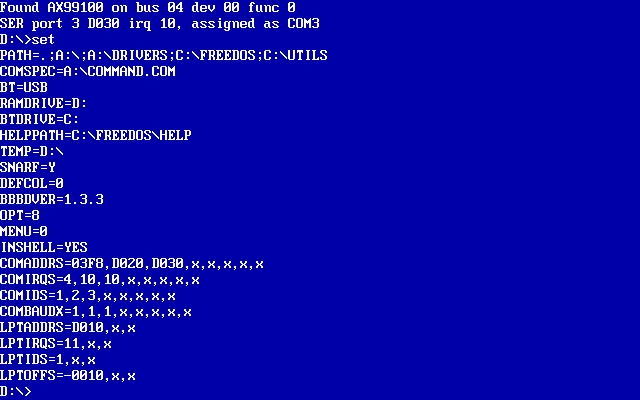
ports on the motherboard if necessary. Finally, it sets DOS environment variables
containing the I/O address and IRQ for each COM and LPT device. Also, for COM
devices it sets a variable for the baud rate multiplier and for LPT devices
it sets a variable for the offset of the extended registers from the base registers.
StagView uses the values in these environment variables to allow it to access
the ports of cards which are not even supported for DOS !
I could see how useful this program could be for other programs and so I also
wrote a DOS batch file to extract the I/O address and IRQ for a port. The boot
disk also uses it to configure the Kermit
communications program to use non legacy addresses and IRQs as well.
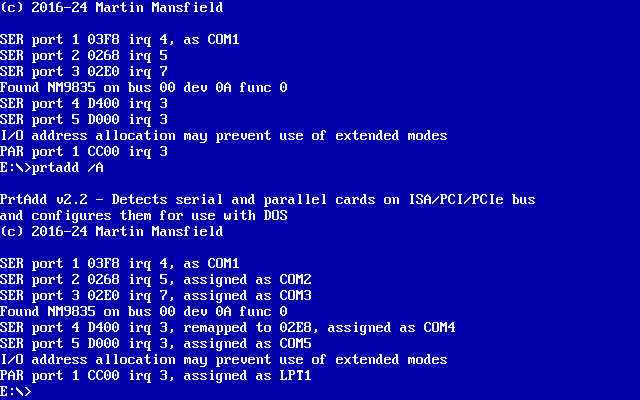
This shows the output from PRTADD when displaying available ports and then
assigning them for a AX99100 PCIe Serial/Parallel card. Note in the first
screenshot that the serial port on the PC motherboard has already been detected
by the PC BIOS as COM1.
The SET command shows the environment variables and the last eight variables
here were added by PRTADD. They provide I/O addresses, IRQ no.s and port identifiers
for COM and LPT ports, baud rate multipliers for COM ports and extended register
offsets for LPT ports to DOS programs that need them, such as PRTLIST.EXE,
STG.EXE and GP.EXE. (Note that for the parallel port the I/O address is D010
for the standard registers and D000 for the extended registers. The offset
for the extended registers is therefore -0010H instead of the Microsoft standard
of +0400H. This allocation of addresses by the PC BIOS makes efficient use
of the available I/O space but will prevent use of the parallel port extended
modes by some programs.)
PRTADD is able to remap ports where the card supports this. In the example
below, the first port of a NM9835 serial/parallel card can be remapped to
an address of 02E8 and assigned as COM4 because it was allocated IRQ 3 which
is the correct IRQ for that COM port. COM2 and COM3 are assigned to serial
ports on an ISA dual serial card. If the ISA card is removed, the first port
of the NM9835 can be remapped to the address 02F8 and assigned COM2 and the
second port can be remapped to the address 02E8 and assigned COM4.
Remapping is useful where old software can only use serial or parallel ports
at the legacy addresses, IRQs and COM/LPT port assignments but cannot be used
on PCs with PCIe slots.
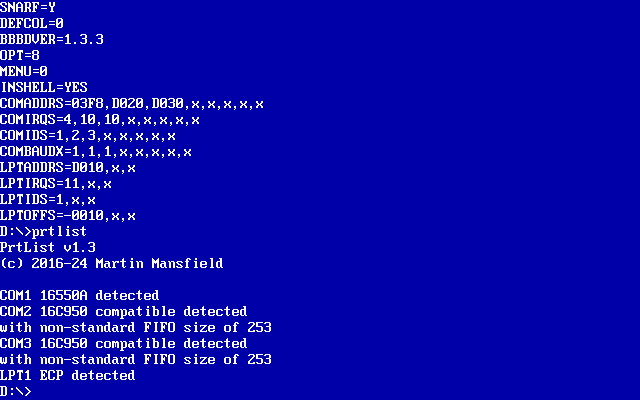
PRTLIST
I wrote this utility to identify the device type for each serial or parallel
port which is known to the PC BIOS and/or assigned by PRTADD. If this is run
after PRTADD it will identify any non-legacy ports on PCI/PCIe cards in addition
to the legacy ports which may be on the motherboard.
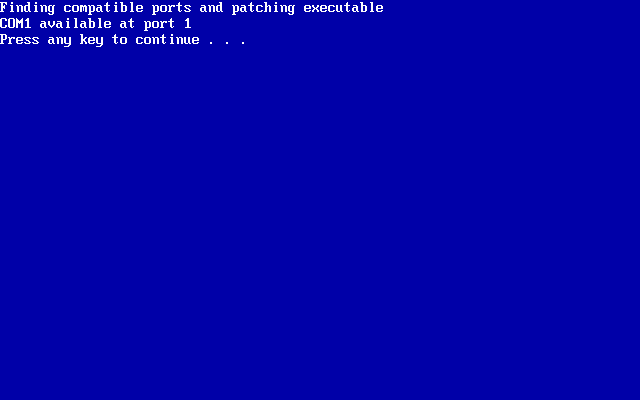
EXEPATCH
A few DOS communication programs can utilise serial ports at non-legacy addresses
and interrupts but the vast majority can only use serial ports at the legacy
addresses and interrupts. For those programs that only support legacy addresses
EXEPATCH can be used to change the locations in the executable containing the
legacy addresses and interrupts that it supports and replace them with the values
for the serial ports that are discovered by PRTADD. The latest version of BBBD
patches the Stag programs "stagcom1" & "stagcomdos"
and Elan programs "exfile" & "lgprog" in this way to
work with almost any serial port at runtime.
Boot disk details
The CD boot disk uses the isolinux and memdisk programs to boot a FreeDOS floppy
image.
The boot sequence for CD and USB boot is normally (assuming that the PC BIOS
can boot from CD or USB)
PC BIOS -> isolinux (with no disk emulation) -> memdisk -> FreeDOS
floppy image
This FreeDOS image loads drivers for the CDROM drive and runs the BBBD.BAT
file in the root of the CDROM filesystem. For a CD boot the CDROM drive letter
will be allocated after any local hard drives that FreeDOS has detected. The
bootdisk does not itself modify any files on any local hard drives but instead
creates a ramdisk which it uses to read from and write to. It will be necessary
to copy files between the ramdisk and a removable drive before powering down
or rebooting the PC as the ramdisk contents would otherwise be lost. If a USB
boot drive is used then the files can be copied to and from that and I plan
to do this save and restore automatically. Alternatively, you can copy files
to and from a local hard drive which is in FAT12, FAT16 or FAT32 format.
I use the Rufus program to create a USB
boot drive from the CD boot disk ISO.
For a USB boot the USB drive letter will be C and any local hard drives will
be allocated letters from D onwards, as you can see the drive letter allocations
are different to those for a CD boot. Initially the boot disk always loaded
the CD-ROM driver but while testing the USB boot disk I found a PC with a BIOS
which generated an error when the driver for a CDROM drive was loaded if the
drive was empty. I needed to know which type of boot it was before loading the
driver for the CDROM.
BOOTFIND
I thought that it would be easy to detect the boot type and set the return
value of the program accordingly. There are many different PC BIOSs using different
APIs or having their own way of showing this information. There is the BIOS
Enhanced Disk Drive Specification from Phoenix versions 1.1 to 3.2 and the El-Torito
Bootable CD-ROM Specification from Phoenix & IBM but some BIOSs just map
the USB drive or CD drive to an invalid drive number. BOOTFIND took much longer
to write than expected and involved testing on 13 different PCs before I could
be reasonably confident that it was ready to use.
More surprises to come
Although by this time I thought that I had tested all the cards supported by
PRTADD, by chance I decided to try sending data to a Stag PP41 using a PCI card
with a NetMos 9845 supporting six serial ports (although BIOS can handle only
four). This particular card was interesting because I had picked it up on eBay
as untested and as six port cards are uncommon I took a chance. The card had
worked correctly with Windows 98 running the WIN32 version of StagView so no
problem I thought. When using it from the boot disk the data sent to the programmer
was corrupted but when sending commands all was well. I thought that the delays
added by StagView for sending data were now not large enough but increasing
them did not help. I decided to add some code which tested the FIFOs of the
chip before connecting but the test failed when the same test passed on several
other cards. After debugging the FIFO test I discovered something very interesting
and worrying about the NM9845 (and also the NM9835), it is not completely compatible
with the 16550 UART. Since the Windows drivers have been written by the manufacturer
they must handle the issue but DOS programs which expect a working 16550 UART
may not work correctly with the NM9835 and NM9845. see this page Serial/Parallel
port compatibility and Serial and Parallel interface
cards tested with PRTADD.
Technical explanation follows.
The serial port code in StagView that calculates the size of the transmit
and receive FIFOs polls bit 6 of the Line Status Register to determine when
both the transmitter and FIFO are empty, bit 5 of the same register indicates
when only the FIFO is empty. The 16550 UART specification says that bit 6 is
set when both the transmitter and the FIFO are empty but the NM9845 sets bit
6 if the transmitter only is empty. After storing a character in the FIFO bit
5 is cleared but there is a slight delay before it is moved to the transmitter
and then bit 6 is cleared. I modified my code to check that both bits 5 &
6 are set to allow for this design flaw in the device.
Screenshots
The main menu which is displayed after the keyboard language prompt
Pressing '1' selects the Stag menu

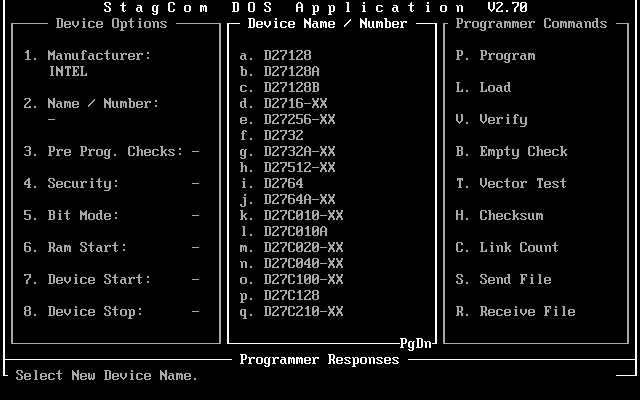
Pressing '5' selects the StagCom DOS program. It can support up to four ports
but in this example only the first serial port, at the legacy address of 03F8,
has an IRQ of 3,4,5 or 7. This check is required because this particular program
does not support the second PIC in a PC that would handle the higher IRQs.
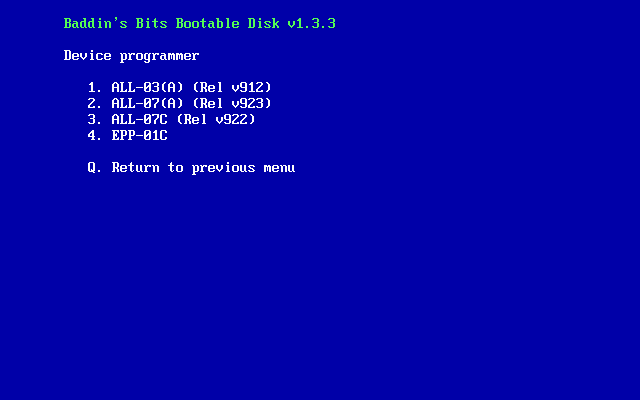
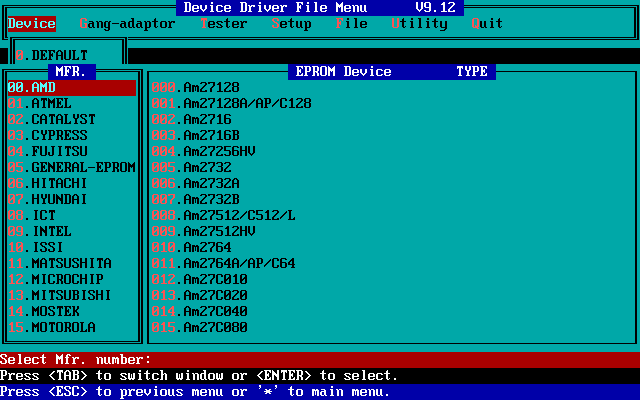
Pressing '5' while on the main menu selects the Hi-Lo menu. Here is a screenshot
of option '1' the ALL-03 application.
Latest releases
Download the zip file containing an ISO file. This version provides applications
to control the programmer using remote mode for Stag PPZ,PP3X,PP4X series, ZL30A/B,
System 3000, Solar, Eclipse, Orbit 32, Orbit 48, P301, P800, P801, P803, GP
Industrial XP640, Elan 5000 and HI-LO ALL-03(A), ALL-07(A), ALL-07C and scripts
to provide basic file transfer for Lloyd Research L9000, GP Industrial XP640,
EP4000, EP8000, P8000 and Elan 5000 and diagnostic tests for Stag PPZ,PP3X,PP4X
series and GP Industrial XP640.
An interactive demonstration of the latest version using the JS-DOS
emulator running in the web browser can be viewed here.
(Please note that the ALL-03(A), ALL-07(A) and ALL-07C applications will randomly
stop working in the emulator, probably because of their size, so just refresh
the browser window. This does not occur with the actual CD/USB drive.)
This release is based on the latest FreeDOS kernel and FreeCom and includes
programs for HI-LO device programmers.
 bbbdiso1_3_3.zip
26/02/24
bbbdiso1_3_3.zip
26/02/24
This release is based on an older FreeDOS kernel and FreeCom.
bbbdiso1_2_3.zip
09/02/23
Creating a bootable CD
Use a CD burning program such as Nero to write the contents of the BBBD ISO
file to a CD-R or CD-RW.
Creating a bootable USB drive
Use the program Rufus to create a USB
drive from the BBBD ISO file. You should disconnect any other USB drives being
used in case they are overwritten by mistake and connect the USB drive which
is to be made bootable, start Rufus and it will automatically select it.
For the "Partition scheme" option select "MBR partition scheme
for BIOS or UEFI" and for the "File system" option select "FAT32".
For the option "Create a bootable disk using" click on the dropdown
box and select "ISO Image" then click the icon next to it and select
the bbbd.iso file. Now click on the icon next to "Format Options"
to display the advanced options. I normally deselect the "Create extended
label and icon files" and select the "Add fixes for old BIOSes".
At this point, check that the correct USB drive is selected and if it is then
click the "Start" button. When finished click on "Close"
and ensure that the USB drive is unmounted (e.g. Use "Safely Remove Hardware"
icon for Windows) before disconnecting it.
Booting from the CDROM or USB drive
For an older PC which does not have USB ports you will need to boot from the
CDROM but you will need to enter BIOS setup first, usually by pressing the DEL
key or a function key. Check the configuration for boot order and change if
necessary so that CD-ROM is before Harddisk in the list. Save your changes and
restart the PC.
For an older PC which has USB ports and a 1.44MB floppy drive but does not
allow booting from USB drive you can boot from a floppy disk containing the
Plop boot manager which
will then boot from the USB drive. You may need to change the boot order configuration
so that Floppy Drive is before Harddisk in the list. Please note that it is
not guaranteed to work with all computers and if it does work the USB drive
will be read-only and the floppy drive should be used to transfer any data files.
The floppy image and instructions to create the bootable floppy can be found
within the CD or USB drive created from the ISO file.
For newer PCs either using legacy BIOS or UEFI with emulated BIOS you should
check in the BIOS setup that Legacy USB support is enabled. When the PC next
displays the BIOS screen there will be an option to select the boot device by
pressing a key. The key to press will normally be one of the following, starting
with the most common.
F12 or F11 or F8
For newer PCs with UEFI and no legacy BIOS they will not boot the BBBD.
Limitations of old DOS applications running on newer hardware
UEFI PCs that emulate BIOS will run FreeDOS much faster than the PCs available
when a DOS application was originally written. Some parts of the application
may not work correctly because timing loops were used for delays so that with
a faster PC the delay will be much shorter. An example of this is File Transfer
with StagCom1, which is one reason why I wrote StagView, but the alternatives
for other applications are to use BBBD on a slower, older PC or, for applications
using the serial port with no hardware handshaking, run them within DOSBox installed
on a modern Windows or Linux OS.
home contact